Engine and Transmission Mounts
Mustang 5.0L engines are known for their impressive low-end
torque. Add in a T5 transmission with its low 3.35 to
1 first gear ratio and you have a recipe for rubber transmission
mount flex and failure. Many guys step up to a solid mount
to get better torque transfer and no flex, however this
transmits harsh vibrations through the transmission. The
polyurethane transmission mount and bushings are a better
option that will increase strength and minimize "rolling"
over of the transmission (which can result in change of
driveline angle) - without the added cost of harsh vibrations
through the floorboard and shifter.
|

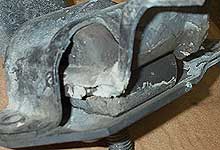
 The stock AOD/T5 transmission mount is a poorly
constructed piece. Note the large spaces between
the rubber and steel, making it prone to flex and
inevitable separation. The Energy Suspension mount
features a fail-safe interlocking design within
the polyurethane encasing.
 |
|

 This mount is significantly more rigid than stock,
yet provides vibration dampening that a solid mount
cannot. Although we did so, it is not neccesary
to remove the transmission in order to install the
mount. Note alse, the center hole in the mount is
not used.
 |
| |
|
|

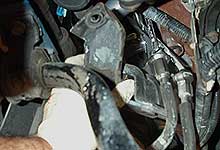
 The transmission crossmember bushings are easily
removed. Slide out the sleeve, then pry out the
rubber bushing.
 |
|

 Install the polyurethane bushings on each side,
then slide in the supplied sleeve.
 |
| |
|
|
Engine Mounts
One of the common problems resulting from increasing horsepower
is the tremendous stress placed on the engine mounts.
We've torn apart the driver side rubber mount on many
of our performance cars. Most enthusiasts resort to either
using an engine torque strap, or in many cases converting
to a solid motor mount (fabricated from steel or aluminum.)
As one can imagine, a solid mount results in no absorption
of engine vibrations, resulting in an unpleasant ride
for anything but a full on race car.
Polyurethane makes an excellent alternative to solid mounts.
The Energy Suspension late-model Mustang engine mounts
are not only of a stronger design than OEM, the polyurethane
maintains a high level of "ride comfort" by
absorbing vibrations.

 The Energy Suspension mounts are a three piece design
(shipped left and right side). Notice how the polyurethane
is molded around the bracket for superior strength.
 |
|

 With the car supported on jack stands, remove the
large 14mm nut which secures the motor-mount to
the frame member. There is one per motor mount and
it will be reused with the new mounts.
 |
| |
|
|

 Using wood to prevent damage to the oil pan, jack
the motor up under the oil pan. This will lift the
engine and mounts off the frame member.
|
|

 Next, remove the motor mount to block attaching
bolts. There are two per mount, and the rear bolts
typically require a socket extension to reach. This
will free the motor mount.
 |
| |
|
|

 It takes a little patience to get the mount out.
You may need to jack the engine up even more. Be
sure to keep an eye on wires or hoses overstretching
as you raise the engine.
 |
|

 A good example of what happens to rubber over time
as it is exposed to pressure and environmental elements.
|
| |
|
|

 The new mount attaches no differently than the OEM
piece. Attach to the block first, then lower the
engine so the mount stud passes through the frame
member.
 |
|

 We also used polyurethane mounts in our Build
a 5.0L engine project. The mounts were attached
to the motor prior to dropping the engine into the
car.
  |
|
|
|
| |
|
|
|
|
|
Sources
|
Energy
Suspension
1131 Via Callejon
San Clemente, CA 92673-6230
Phone 949-361-3935 |
|
|
|
|

