|

Text and images by C.Asaravala. Blood,
sweat, and tears by John B.
DIY or not?
There is something to be said about the do-it-yourself attitude.
However there are some projects that leave you tired, beat
down, and wishing you had just dropped the car off at a shop.
The 8.8" gear swap may very well be one of those tasks.
A few months back we attempted a rather straight-forward gear
swap on our 2001 Mustang GT. The 8.8" Traction Lok rear
end in this car is the same style Ford has been using on the
Mustang, Thunderbird, F150 and similar vehicles since the
early 80's. Hundreds of thousands of guys have swapped out
their 8.8 gearing for better acceleration. Needless to say
changing the ring and pinion on these cars is not supposed
to be a big deal. Well we must have had the one car that wanted
to buck the trend. What should have been a two or three hour
project took about seven hours. In retrospect it's quite comical
that we had so much trouble. Heck, it's even educational.
So, for anyone wanting to learn how to do their own 8.8"
gear swap, here are the do's and don'ts. We caution you, we
have spared no detail or agony. Also note, you'll need all
the common tools, plus access to a press. You can't do the
job without a press so make sure you have that squared away
before your tear into the differential.

 Most guys are too scared to tackle an 8.8" gear swap.
Our friend John B. has done plenty and was willing to
show us that it's not too bad. Our 2001 GT is in the garage
and ready for a seemingly routine two-hour gear job.
 |

 When servicing your Ford 8.8 rear end jack up the rear
of the car high enough to work comfortably and use stands
under the axle housing. Chock the front wheels.
 |

 Remove the calipers and support
them using wire so that the caliper weight is not hanging
on the brake hose.There is no need to disconnect any brake
lines.
 |

 Use a 12mm 12pt socket to remove the drive shaft flange
bolts and place the driveshaft out of the way.
 |

 Remove the ten 10mm-socket differential cover plate bolts
and pry the cover open, allowing the fluid to drain into
a pan.
 |

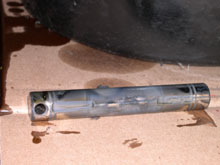
 Unlike the Ford 8" or 9" differentials, the
8.8" is assembled directly in the housing itself.
Remove the pinion shaft retaining bolt with a 8mm wrench.
It helps to insert a screwdriver into the center of the
Traction Lok assembly to keep the unit from turning.
 |

 Drive the pinion shaft forward, then rotate the gear and
pull the entire shaft out.
 |

 The suckers are tough to see but a pair of "c-clips"
retain the axles in place. Remove and save these two clips.
It may help to push the axles in bit to gain access to
the clip.
 |

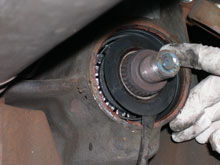
 The
axles can now be removed or slid back far enough to allow
the gear assembly to be removed. Now is a good time to
inspect and change the axle seals at the end of the housing. The
axles can now be removed or slid back far enough to allow
the gear assembly to be removed. Now is a good time to
inspect and change the axle seals at the end of the housing. |

 Mark or scribe the bearing caps so they go back on the
same side and direction. Then remove the two bolts per
cap.
 |

 The Traction Lok and gear assembly can now be removed
from the differential housing and set aside.
 |

 Working at the front of the differential case, remove
the pinion nut - this is best achieved with an impact
gun. If you don't have one, it is suggested you loosed
this nut before you even take the differential cover.
Put the car in gear with the parking brake to keep the
gear from turning.
 |

 If the pinion flange doesn't pull off you will need to
use a gear puller like this one.
 |

 Usually
the pinion will come free with a few smacks from a hammer.
Do this with the pinion nut back in place to protect the
threads. Our pinion was not going to budge and since we
were replacing the gearset we weren't concerned about
damaging it. Usually
the pinion will come free with a few smacks from a hammer.
Do this with the pinion nut back in place to protect the
threads. Our pinion was not going to budge and since we
were replacing the gearset we weren't concerned about
damaging it. |
|

