|
Engine Disassembly
One of the cost
saving benefits of doing a stroker motor was the fact
we'd use our old block as the foundation. The '89 5.0L
block has never been bored over, and since we had been
racing it for the past two years, we were certain there
were no cracks or surprises.
We spent a weekend pulling and disassembling the old
engine. In order to prevent interference with the rod
bolts we clearanced the bottom of the cylinder bores-
a common procedure for 302 based strokers. Finally we
took a few measurements and dropped the motor off at
the machine shop with our specifications.

1. It's hard to believe,
but our "400 Horse 302" project is tired
and ready to receive an overhaul. |

2. With the engine
bay of our '67 Mustang emptied out, we may upgrade
the steering box and some other components. Look
for related articles soon. |

3. The old 302 comes
apart. We'll reuse just about everything but the
gaskets on the new 331 stroker. |

4. It only takes about
30 minutes to tear down a motor. We'll knock out
the freeze plugs before delivering to the machine
shop. |

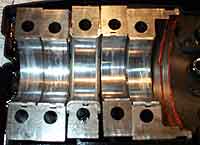
5. The
old main bearings were in surprisingly great shape
-not bad for 200 passes shifting at 7000 rpm! |

6. The old KB pistons
show minimal wear, and signs of normal combustion
(carbon build up is centralized around the exhaust
valve.) These pistons and rods can be reused in
someone's 302 with a little clean up. |

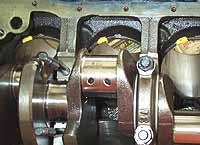
7. We laid the new
331 crank, and a piston/rod assembly, in place temporarily
in order to check for clearances as the crank rotates. |

8. As suspected the
rod cap screws just barely (0.005") clear the
cylinder bore skirt. |

9. Using some yellow
paint the areas needed notching were identified.
As you can see, every bore needs a little notch
on the thrust side of the skirt at about the 12
o'clock position. |

10. We rough cut the
notch using a carbide cutting ball and an electric
drill. We went back with a Dremel tool and stone
bit to smooth it out. Only 1/8' deep notch is required,
slighty more for the 347 crank. |

11. While we had the
carbide ball out, we chamferred the oil return holes
in the lifter valley and also the oil filter mount.
This simply helps the oil drain faster. |

12. Before hauling
the block off, we used a bore dial gauge to measure
the taper in the bores, and also any out of round
in the main bearing tunnel. We'll drop the block
off and specifiy a 4.030" over bore, and no
align hone on the mains since they checked out within
specification. |
While the block is being machined, we'll list out and
purchase the gaskets and other materials we need. In Part
II we'll put it all together. F/M
|

