|

Setting up the fuel system is likely the most challenging
part of a carburetor to EFI conversion. If you are considering
producing any significant amount of power you'll want to redesign
the entire system, with proper EFI components and fuel lines
sized to your anticipated power level. It's in the proper
selection of fuel system components, rather than the installation,
where the complexity lies. Mass-Flo now also sells complete
fuel systems using the same Mallory components we used here.
How Much Fuel?
Picking up a parts catalog and ordering a fuel pump, injectors
and other components solely on the claimed supported power
levels is surely to result in a costly mismatch of parts.
You have to begin with some calculations. The first step is
to determine how much horsepower your fuel system needs to
support. This should be a realistic figure representing flywheel
horsepower. The good thing about EFI systems is that it is
ok to have a  system
which supports more power than you may be making, within reason.
If your motor is at 400 horsepower now but you are planning
for a supercharger, use 600 HP as the value. system
which supports more power than you may be making, within reason.
If your motor is at 400 horsepower now but you are planning
for a supercharger, use 600 HP as the value.
The next variable needed for the equation is BSFC or brake
specific fuel consumption. Without the proper dyno cell and
measuring equipment it is not practical to actually calculate
BSFC. However, engineers have determined BSFC to be between
0.4 and 0.5 for typical four-stroke naturally aspirated gasoline
engines. Use a value of 0.6 for nitrous and 0.7 for forced
induction. Multiply your engine horsepower by the BSFC factor
to get fuel consumption in per hour. We've calculated that
a 600 horsepower supercharged car would need 360lbs per hour.
A gallon of pump gas weighs roughly 6lbs, so this equates
to 60 gallons/hour, or 227 liters/hour (1 gallon = 3.79 liters.)
 So
we should go out and get a 60 gph pump right? No. The volume
that a pump puts out is a function of pressure. Therefore
we cannot simply rely on the advertised free-flow fuel pump
volume ratings. We need to select a pump that will flow at
least 60 gph (227 lph) at 40 psi, the psi of our fuel injected
system. For our 600HP example application the Mallory 5110FI
Comp Pump would be ideal. According to Mallory's flow data
this pump will produce 90 gph at 40 psi, well above our requirement
of 60 gph. Alternatively the Mallory 4261FI universal pump
is rated at 226lph (60gph) @ 40psi. This pump would be right
on the border line of our fuel requirement and probably better
suited for a 400-500 horsepower application. For our project
we'll start off with the easy-to-install universal inline
4261FI pump. Once we have the engine running and tuned naturally
aspirated we will then install a Vortech supercharger and
upgrade to the 5110FI pump. Look for this in part 2 of this
series in an upcoming issue. So
we should go out and get a 60 gph pump right? No. The volume
that a pump puts out is a function of pressure. Therefore
we cannot simply rely on the advertised free-flow fuel pump
volume ratings. We need to select a pump that will flow at
least 60 gph (227 lph) at 40 psi, the psi of our fuel injected
system. For our 600HP example application the Mallory 5110FI
Comp Pump would be ideal. According to Mallory's flow data
this pump will produce 90 gph at 40 psi, well above our requirement
of 60 gph. Alternatively the Mallory 4261FI universal pump
is rated at 226lph (60gph) @ 40psi. This pump would be right
on the border line of our fuel requirement and probably better
suited for a 400-500 horsepower application. For our project
we'll start off with the easy-to-install universal inline
4261FI pump. Once we have the engine running and tuned naturally
aspirated we will then install a Vortech supercharger and
upgrade to the 5110FI pump. Look for this in part 2 of this
series in an upcoming issue.
Injector Sizing
Once you have calculated the amount of fuel your engine would
use, in pounds per hour, you can easily calculate the proper
injector size. This is done by dividing the fuel requirement
by the number of injectors (8 for a V8 engine, etc.) In our
example of 360 lbs/hr this gives us an injector size of 45lbs/hr.
However injectors should not operate at 100% of their "duty
cycle". Duty cycle is the time the injector is open before
it must open again. At high rpm duty cycle should not exceed
80% to avoid overheating and damaging the injector. Therefore
we want to divide our result of 45lbs/hr by 0.80 to give a
safety factor. This yields an optimal injector size of 56
lbs/hr for a 600 horsepower engine. We will initially start
with a set of 30lb/hr injectors to get the EFI system up and
running naturally aspirated. When we install the supercharger
we'll step up to the larger fuel pump and injectors.

 We had previously
modified our stock fuel tank pickup to 1/2" line
and welded on a -8AN fitting. This will make it easy to
plumb in an external EFI fuel pump.
 |
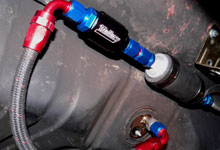
 We mounted the Mallory 255lph inline fuel pump above the
fuel tank, screwing into the trunk sheet metal and not
the tank! We're using the Mallory filter to keep the pump
clean of debris.
 |
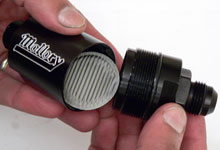
 The Mallory 3175 fuel filter comes with a 40 micron disc
filter. This is sufficient as a pre-filter for the pump,
but not as a filter for fuel injectors. We'll mount another
filter in the feed line before the injectors and use a
5 micron element, available from Mallory PN# 3177.
 |

 The 1/2" aluminum hardline runs from the fuel pump,
along the subframe connector, and to the front frame rail.
Here it connects to another Mallory 3175 filter, this
one with a 5 micron filter element to keep the injectors
clean.
 |
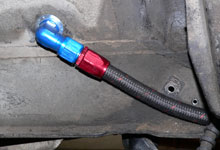
 Saftey is of utmost importance with any fuel line, but
more so with the high pressure EFI lines. Rather than
pass a hose through sheet metal we're using an Aeroquip
bulkhead
connector. Available in various AN sizes and angles this
also preserves our -8AN feed line to the injector rails.
 |
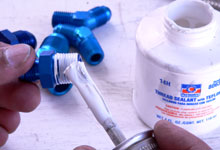
 The injector rails get -AN to NPT adapter fittings. Use
Teflon pipe sealant (not tape) on only the pipe thread
side of the fitting, never use any sealer on the 37°
taper or AN threads.
 |
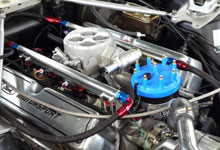
 From the bulkhead fitting at the firewall the fuel enters
the driver-side injector rail. A short piece of hose routes
the fuel to the passenger side rail and then out to the
regulator.
 |

 There are several ways to configure the regulator. We
have a single -8AN line from the rails to the regulator.
Alternatively each rail can have separate feeds and exit
lines to the regulator. In all cases you must run a bypass
(bottom fitting) which returns the excess fuel back to
the tank. We're using a -6AN return line.
 |
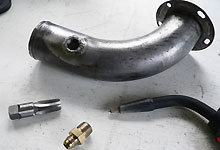
 The easiest way to get fuel back into the tank is to modify
the fuel filler neck. We pulled it out and welded in a
steel bushing which we tapped to accept a -AN fitting.
Don't make the mistake of welding the fitting to the tube
because you wont be able to get the tube back through
the tail light panel.
 |
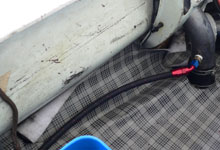
 Our aluminum return line runs under the car and then is
coupled through the trunk floor with a soft line that
routes the fuel to the tank via the filler neck.
 |
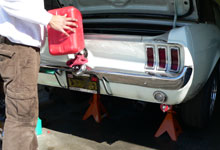
 Don't wait until you are ready to fire up the car to test
the fuel system. We threw in a few gallons of fuel and
wired the pump directly to the battery to prime and check
for leaks.
|
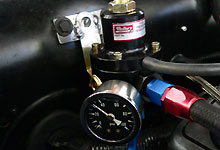
 The system showed no leaks and we verified pressure. This
is also a good moment to set the initial fuel pressure
to 39 psi. Once the motor is running you can set it to
39 psi with the vacuum hose disconnected.
 |
Fire in the Hole
Once your fuel system has been installed and verified to be
leak free the EFI conversion is ready to be put to the test.
Prior to cranking the motor over you should verify all the EFI
electrical connectors are connected to their respective sensors.
Fire up the motor and then set fuel pressure to 39-40psi with
the vacuum line disconnected and plugged. When adjusting base
timing be sure to disconnect the SPOUT connector.
In the next installment of Project '67 you'll see the results
of the EFI conversion on our 331 motor. We'll then install
the supercharger and tune the EFI system for maximum power.
Continue to:Part II - Getting it to Run 
|
|
|
|
|
Posted by 302stang, 04/23/07 09:50pm:
do you guys have problems with fuel sloshing away from the pickup at all id think that without a sump or a header tank there would be problems when driving on the street and cornering.
Posted by admin, 04/23/07 10:13pm:
So far no problems, but I do try to keep the fuel tank above 1/4 tank full.
Posted by 302stang, 04/27/07 12:48am:
cool. i am starting a 408 efi build and am thinking about building a header tank.
this is for my 68 coupe by the way. tranny is a t5 and rear is a trac lock 8.8.
the motor will feature rhs 215cc heads or maybe if i can scrounge up the money afr 225s. im shooting for 500 rwhp that i can still drive on the street.
i might try and use one of those drop sumps that they use on carbed cars jsut as extra insurance.
either way ill let you guys know how it works.
Tom
Posted by akeyzoo, 05/22/07 10:10am:
BTW, I have the new version of this kit, let me know if you would like pics of the now mass-flo branded intake manifold. It is apparently a bit shorter than the victor junior and has the bungs cast in.
Chris
Posted by CantedValve, 08/05/07 07:55am:
Exellent article. It looks like you got your intake, computer, and throttle body from Mass Flo. I know a complete system for my car is around $3000. Are you keeping/willing to disclose what you guys would spend on what you are doing here?
Posted by admin, 08/05/07 08:18am:
We didn't spend quite that much. You can pick up things like the computer from used classifieds or salvage yards.
Also you can save by putting together your own fuel system. All said it will still cost $2000 or so with the brand name, top quality parts.
Posted by 4REKILLER, 08/18/07 03:02pm:
I am installing the Mass-Flo EFI system on to a 392W Ford create engine. After reading your article and checking out the Mass-Flo website. I have a question about the Mallory 4305M regulator that comes in the Mass-Flo system. Mallory installation instruction have the fuel system regulator feeding the injectors from one of the three 3/8 NPT fitting on the regulator to the fuel rails with no return. The bypass is going back to the tank and the inlet port comes from the fuel pump. Mass-Flo has the fuel pump supplying the fuel rails first and the regulator after. The line coming from the fuel rails is connected to the inlet port. The three 3/8 NPT ports are plugged and the bypass is goes back to the tank. The same as you did on the DIY EFI article. What way is the right way and why?
Posted by schaeferdon, 09/04/07 11:33am:
Hey EFI'ers and EFI wanna-be's: Save yourself some headaches when designing your fuel delivery system. Ron Morris Performance (www.ronmorrisperformance.com) makes a $99 EFI sending unit for classic Mustangs. It has both supply and return tubes which, with a 37 degree AN flaring tool, you can easily adapt to -AN fittings and steel fuel lines. In fact, I simply purchased two, 3/8" pre-bent fuel lines (@$49.99 apiece), ran them parallel to one another, flared the ends to 37 degrees, and used the appropriate -AN fitting to connect them to the fuel sending unit. Ron Morris himself recommends a baffled fuel cell tank (because hard acceleration causes fuel starvation). I simply installed a 22-gallon, 1970 fuel tank in place of the stock 16-gallon unit. Since I'm not drag racing, I figure the extra fuel capacity will alleviate any potential fuel starvation problems. By the way, both Chris at Mass-Flo and Ron Morris are very helpful if you email them with questions.
Posted by GranTorinoMan, 01/19/08 07:32am:
The Mallorey pump your using has a return feed on the bottom for priming, are you using that?
Posted by BroncoRick, 12/28/09 05:58pm:
Are you planning on trying something a little less daunting like the EZ EFI or the
Professional Products "Powerjection111"
My digging shows them both to be self tuning and nether requires a manifold change and minimal wiring.
Apparently they both tune while you drive.
I eagerly await your response
Posted by hellfirejim, 07/29/10 08:54am:
Excellent article but you are doing it the hard way. go take a look at the professional products Powerinject 3.
http://www.professional-products.com/EFI_3.php
This system will handle upto about 550hp, can be had as returnless system and the wiring consists of only 6 wires.
I forgot to mention that it bolts on any holley style carb manifold. Additionally the whole system is complete. chek it out.
Posted by admin, 08/08/10 09:59pm:
The pro-products EFI looks interesting indeed. Anyone tried it yet?
|
|
|
|
|
|
|
| |

| Mallory offers
a selection of fuel injection fuel components for mild
to massive horsepower levels. Shown are (1) Comp 110FI
Pump, PN: 5110FI, (2) Universal in-line 255lph pump,
PN:4261FI, (3) Regulator
PN:4305M, and (4) and in-line 5/40 micron fuel filter
PN:3175. |
|
| |

| The most
expensive parts aren't always the best. We opened up
a $135 Aeromotive #13109 regulator (top) and a $99 Mallory
#4305M. Both are quality pieces but the Mallory unit
has 4 inlets not 2, dual springs, a bigger bypass, and
a range of 30-100 psi rather than 30-70. It also has
a patented technology to reduce pressure fluctuation
and flutter. All that and you keep $36 in your
pocket. |
|
| |
|
| |
|
| |
We used a variety of Eaton-Aeroquip
fittings and adapters to connect the pump, filter, regulator
and fuel rails. Rather  than
steel-braided line we opted for Aeroquip's StarLite
hose. The StarLite hose is 45% lighter than steel braided,
but more importantly it offers much easier cutting and
assembly, while using the same reusable AN fittings.
The hose is covered with a Nomex™ / Kevlar™
sheath for fire and abrasion resistance. than
steel-braided line we opted for Aeroquip's StarLite
hose. The StarLite hose is 45% lighter than steel braided,
but more importantly it offers much easier cutting and
assembly, while using the same reusable AN fittings.
The hose is covered with a Nomex™ / Kevlar™
sheath for fire and abrasion resistance.
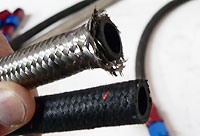
 Unlike steel braided hose which frays and can
be a bear to work with, the StarLite hose cuts
easily and cleanly with a razor blade.
 |
| |

 Assembling the hose ends is the same as for steel
braided hose. Insert the hose into the socket
until it bottoms out
 |
| |
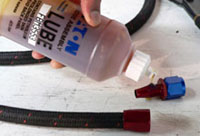
 Use lubricating oil or Aeroquip Hose Assembly
lube on the nipple threads.
 |
| |

 Insert the nipple into the socket and screw together.
The last few threads will require holding the
socket steady with another wrench, or by placing
in a vice with a set of aluminum jaws (PN FCM3661).
 |
|
|
| |
|
| |
|
|
|

